
DIY Concrete Countertops

After a visit with my old friend, Mark Melonas, from Luke Works in Baltimore, MD, we received encouragement and inspiration to try our hand at our own concrete countertops. I expected a learning curve, so I wanted to share our experience with as much transparency as possible because the pros like Mark, make it look easy - and it's NOT.
DIY Concrete Countertops: The Approach
- Styrofoam Forms - Most of the DIY videos out there utilize the technique of forming the molds using melamine sheets. A newer (but not new) technique is foam rails instead of the melamine/particle board, so I decided to try it out as the lazy method to avoid having to cut the rails. I didn't have great carpentry skills and want to haul several pieces of 4'x8' melamine sheets from the store.
- Avoid Polishing - Polishing can, theoretically, be avoided entirely by using the glossy polycarbonate casting base and glossy form tape. Typically, the molds are melamine, which leaves a matte finish, so polishing is required. The thought of no messy polishing came to mind, so I was motivated to try a glossy base for my form. There are newer techniques using acid to reduce polishing time, but in the end I still had to polish. (So much for that idea!)
DIY Concrete Countertop Supply List:
- $145 Cheng Pro-Form Mold Making System 2.5"- I had recently junked my table saw, and found it inconvenient to buy many sheets of 4'x8' melamine sheets for the mold, so I thought I'd avoid all that cutting and use the foam rails. While the $145 price seemed a bit steep for a bunch of foam rails, some tape, and vinyl, it was actually all worth it for the 7 uniquely sized slabs I had to form. I tried to source foam rails elsewhere, but failed.
- $300 Concrete mixer from Lowes - I thought about renting, but due to the amount and size of the slabs I was making, buying was in my best interest. It took 3 hrs to assemble, and it works really well. I've rented mixers in the past from The Home Depot, and was unimpressed... the motors were really worn out, gears slipped, and I told myself I'd never do that again.
- $65 Polycarbonate 4'x8' sheet from Tap Plastic to use as a casting base. In the end I went through 3 sheets.
- $66 Cheng Glossy Form Tape 2.5" - expensive tape to make shiny edges
- $32.50 Cheng faucet knockout for form
- $25 Lowes foam insulation board to cut out the sink knockout
- Silicone caulk
- Masking tape
- $150 Hydraulic table on wheels from Harbor Freight - for move the slabs from the casting table to the kitchen. Each slab was about 320-420 lbs.
- $25 Cheng Acrylic Slurry - for patching holes and blending seams.
- $165 Hardin VPS5 wet polisher from Amazon
- $29 Cheng Sealer
- $23.50 Cheng Finishing Wax
- Black edging for the plywood between the countertop and the cabinets
- Jigsaw, disc sander for cutting out sink knockout
- Metal screen and rebar
- Concrete mixing tub, trowel, shovel
- Sakrete 5000 concrete - 24+ 80 pound bags
Concrete Countertop Guys Do It Upside-down
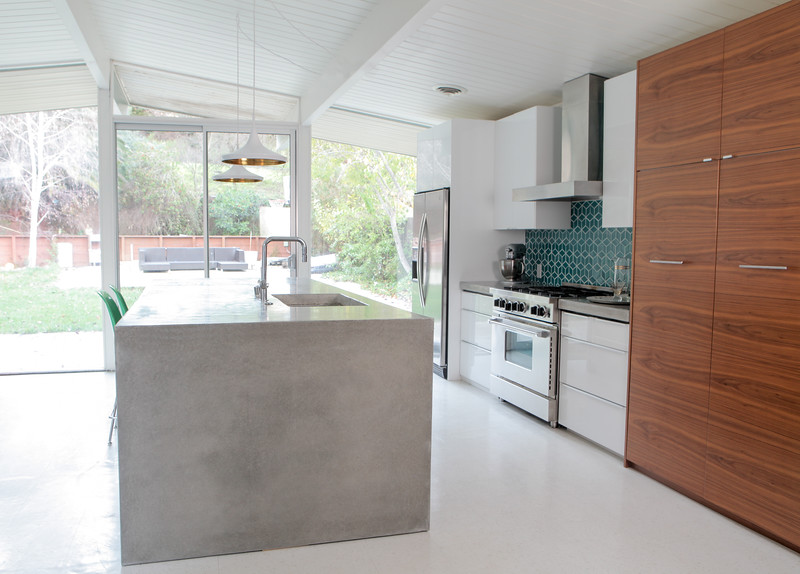
When you cast a countertop, you need to imagine everything you do upside-down. The finished surface is actually the bottom of the form. The finished surface will be as good as the concrete touching the base surface of the form. We constructed the mold using the Cheng foam rails. You setup the rails, tape the vinyl liner, caulk the seams, and pour. We used a glossy polycarbonate casting base to leave a super glossy countertop finish.
Concrete Countertop Mold
We constructed the mold using the Cheng foam rails. You setup the rails, tape the vinyl liner, caulk the seams, and pour. We used a glossy polycarbonate casting base to leave a super glossy finish.


We tried the Cheng additive to reduce the setting time, reduce the amount of water required (for strength) and supposedly the chemicals also make it stronger, but later own after numerous failed attempts, just used the straight Sakrete concrete with water, which seemed to work just fine.


Mixer from Lowes took about an hour to assemble.


Plastic over the concrete to help keep in the moisture and warmth to reduce cracking and let the chemicals work their magic.

Our first attempt came out a complete failure, as the mixture was too dry. By the third try, we found the right consistency. There is a slump test we failed to do that you can Google.


Our third attempt came out nicely - here are the slabs taken out of the forms and flipped over to reveal the surface. They appear very dark before all the moisture finishes evaporating during the curing phase.

With the plywood in place, we installed our first slab, wheeling it into the kitchen with the help of our hydraulic lift from Harbor Freight.

With this installation, we went straight from mold to counter. At this phase, we should've polished, but we got impatient and moved it in.


The other pieces were casted reusing the rails - the image above showing the knockout for half the sink and vent.

Here is a Cheng knockout for a faucet or vent, which allows standard faucets and fittings to fit into a 2.5" slab. This is really important or you will have no room to fit the nuts around the threads.

Here we added some mesh for strength.


The surface here doesn't need to be perfect, as it'll be the bottom of the slab when installed.

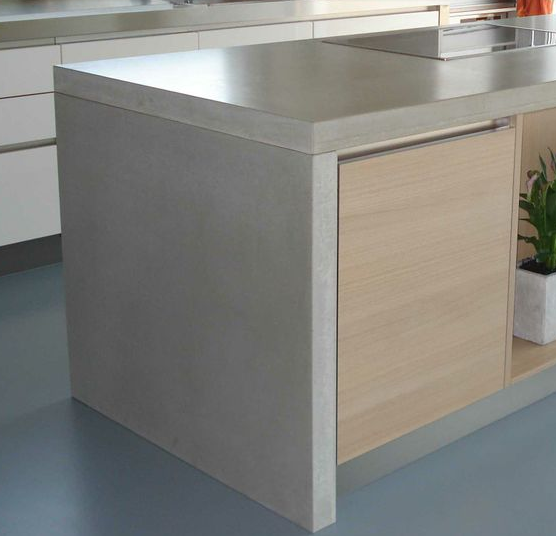
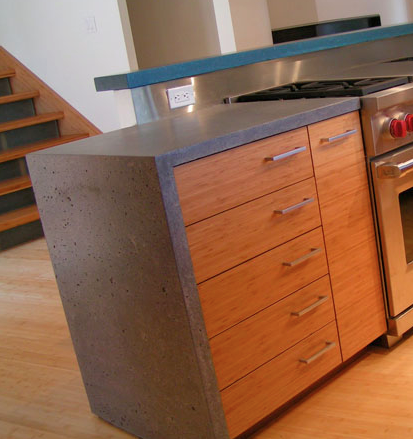
Waterfall Edge Concrete Countertop
We loved the look of the waterfall edge for our concrete countertops, but knew I'd have to do it in two pieces rather than attempt a single piece. A single piece would've been attainable with a pour in place or GFRC, but neither of those options seemed viable at the time. We ended up doing a 2-piece corner using a mitered joint, then filling in the seam with a slurry mix. You can see in the photo above the 45 degree end piece overhanging the island.
The two ways to do the waterfall joints:
Here is a more basic finish option.
Here is a seamless waterfall edge. Photo by Luke Works.
The island slabs were much more complicated for various reasons: They were larger, required a mitered edge for the waterfall sides, and had a sink in between slabs. We calculated the larger possible slab we could cast on our 4'x8' sheet of melamine, and casted 3 pieces for the surface that, unfortunately, had to split the sink in half.
There were seams, that we could have slurried over, but we felt that we'd leave the seams that would add that artisanal feel to the countertop. The Cheng method for seams is to not hide them, but to make a clean butt joint, a sharper edge than normal, by whiping away all the caulk when you run your finger over the mould seam, instead of keeping a smooth contour like all the other seams between the base casting surface and the rails. (This would be only along the seam that would butt up against another piece.)
Vinyl Edging for Countertop Sub-countertop

We also added black vinyl edging to the plywood edge just below the concrete to cover up the raw wood and add a shadow effect. It irons on easily and helps accentuate the shadow just beneath the countertop and cabinet.

There were little holes from air bubbles that needed to be filled with a concrete slurry, and after we applied that, we needed to wet polish. There was a square outline indented in the surface from the two previous casts of smaller pieces. The silicone residue left from the previous cast was not visible to the eye, but the concrete was extremely sensitive and picked every little thing up.

We made the mistake of prematurely installing the countertops before they were polished, but we didn't think we would end up needing to polish. The seams and sink were filled with silicone before the wet polishing routine which we ended up doing a couple times. This created a huge mess, but was better than moving all the slabs back outside.
I bought a wet polisher from Amazon for $165 and started the polishing process.


Revisiting our initial approach:
1. The foam system was simple and easy, but there were drawbacks:
- The rails warp after the first use from either the tape, weather, concrete, moisture, etc. But I reused them several times.
- It's hard to screed the cement compared to a wooden rail, as they are delicate, and don't allow a 2x4 to slide across the tops easily.
- They are hard to cut accurately on a table saw. I had several slabs that required 45 degree miter joints, so the rails needed to be trimmed at 45 degree angles. Not sure they the Cheng rails ship w/ a 40 degree angle, but it was quite the pain to rip off 5 degrees.
- They are delicate, so removing them caused them to break easily, so I learned to remove them from the surface tape very gently.
- It was easy to not form a perfectly straight edge, so I had several slabs with curved edges (amateur move since I refused to use a template)
2. Casting on the glossy poly sheet proved to produce an awesome finish, but the reality is you have to still wet polish. No polishing will ever produce the same gloss, but it'll still look nice. Here's what I learned:
- If you have to apply slurry, you have to wet polish. The slurry creates a dull film across the surface that I tried sponging off, dry polishing off, and scraping off... but it doesn't matter. Once that stuff dries, you need to wet grind it off.
- The glossy casted surface might look perfect with no voids or holes, but once you start polishing, you'll notice that you uncover many little voids that will need to be filled. It's sort of a false sense of perfection.
- The glossy surface is actually coated with a light later of white cloudy concrete chemical, so if you want a richer color to be your final finish, you will need to polish it off.
- You CAN avoid the wet polish, but with the caveat that the finish will be lighter than desirable, and if you did have a lot of voids, you would have to ditch the gloss and start polishing. I did try two of my first slabs going straight from form to counter to sealer and wax, and it does look fine, but will look better if I had spent another day polishing, slurrying, polishing, then sealing and waxing. The two smaller slabs on each side of the stove had no polishing and they look fine, but I would believe that any experienced concrete countertop guy would spot that it wasn't quite finished.
- The surface of the casting surface is SUPER important to keep flat; every tiny little imperfection on the casting surface is picked up during the casting process. The polycarbonate sheet had little dips that you couldn't see, which made polishing difficult. Messy caulk smears, and residue from previous castings created marks on the concrete that I spent extra time wet polishing off.
Mistakes I wouldn't want anyone else to make:
- Complete your slabs outside the house before moving them in. I thought I could move them in and make sure it all fit before the slurry and polish, but wet polishing inside the house really sucks.
- Not used a template - I didn't have materials to make one, so I just used measurements. I wasn't too far off, but it makes the mold making process 3 times longer, and less accurate.
- Wasted my time with trying to avoid polishing. Although you can theoretically avoid polishing, the finish isn't what you would expect. It was costly, and in the end, I still had to buy a polisher.
- I made a mistake with the mitered edge on one of the pieces, where I measured the mold size to the outter edge instead of the inner edge of the final countertop. Because you do the mold and everything is upside down, and the fact that I didn't use a template, I had to recast a very large and intricate sink piece with a mitered edge TWICE.
- I made multiple casting on the same sheet of polycarbonate - you should really be using a fresh piece each time to avoid picking up imperfections caused by each casting process.
If I was to do it all over again, I would consider GFRC and a foam core. Five of the 7 slabs were each 320-425 lbs, and for the 2.5" thickness required much more concrete [in theory] than with a GFRC process, and would be just as strong, if not stronger. The learning curve and tools required require additional cost and ramp up time, but I would believe that the front-loaded investment would payoff in the end. If you were doing a 1.5" slab, I'd say just cast it conventionally, but for a 2.5" slab, it just requires more concrete, and yields a slab that most DIY hackers would want to avoid.